Android学习笔记:常用控件
第1页Android学习笔记:常用控件
今天将介绍android系统为我们提供的常用控件中的TextView,Button,EditText,RadioButton,CheckBox,ToggleButton,RatingButton七个控件的声明和事件响应。
1、 TextView
类似ASP.NET中的Label控件,只读显示控件,可通过getText()获取其android:text属性、setText()设置其android:text属性。在res/layout/main.xml的LinearLayout节中添加如下代码来声明TextView。
1 TextView android:layout_ width="fill_parent" android:layout_border="1" height="wrap_content" android:text="@string/hello" android:id="@+id/myTextView" />
在java代码中可以通过下列代码取得该控件。
1 //取得该控件
2 TextView myTextView =(TextView)findViewById(R.id.myTextView);
2、 Button
按钮控件,用户通过该控件来提交自己的请求,是用户与应用程序交互的最常用控件之一。
1)普通按钮
在res/layout/main.xml中声明控件
1 Button android:layout_ width="wrap_content" android:layout_border="1" height="wrap_content" android:id="@+id/myButton" />
2)用户自定义按钮
用户自定义按钮在很大程度上满足了用户个性化的要求。在这儿创建一个用图片代替普通文字的按钮。
首先把图片复制进res/drawable*文件夹(三个文件夹都需要);然后再同一个文件夹中创建一个my_button.xml用户定义我们的格式选择文件;
1 xml version="1.0" encoding=""?>
2 selector xmlns:android="http://schemas.android.com/apk/res/android">
3 item android:drawable="@drawable/hmenulock"
4 android:state_pressed="true" />
5 item android:drawable="@drawable/hmenuunlock"
6 android:state_focused="true" />
7 item android:drawable="@drawable/hmenuunlock" />
8 selector>
当my_button.xml文件被引用后,上面的item的顺序就非常的重要了。因为在进行匹配时,android:state_pressed和switch的case一样,只要有一个item匹配成功,后面的就将不再进行下去。
最后在res/layout/main.xml中引用我们刚才定义的my_button.xml。1 Button android:layout_ width="wrap_content" android:layout_border="1" height="wrap_content" android:background="@drawable/my_button" android:id="@+id/myButton" />
android:background=”@drawable/my_button”定义了引用的背景选择文件来自drawable文件夹的my_button.xml。
上面简单的介绍了如何定义一个普通Button和自定义格式的Button。那么如何响应用户的动作呢?
1 //响应Button的Click事件
2
3 myButton = (Button) findViewById(R.id.myButton);
4 myButton.setOnClickListener(new OnClickListener() {
5
6 @Override
7 public void onClick(View v) {
8 // TODO Auto-generated method stub
9 Toast.makeText(Android_Control_DemoActivity.this,
10 "click Button", Toast.LENGTH_SHORT).show();
11 }
12 });
3、 EditText
Android系统提供给用户输入的文本框,如ASP.NET中TextBox。
在res/layout/main.xml中添加EditText标签。
1 EditText android:layout_ width="fill_parent" android:layout_border="1" height="wrap_content" android:id="@+id/myEditText" />
让我们的EditText一个回车动作,请看下面的代码,代码里演示了如何取得EditText的值以及如何为TextView赋值。
1 //操作EditText控件,取值以及响应事件
2 myEditText = (EditText)findViewById(R.id.myEditText);
3 myEditText.setOnKeyListener(new OnKeyListener() {
4 @Override
5 public boolean onKey(View v, int keyCode, KeyEvent event) {
6 // 响应用户的回车键动作,将EditText中值显示到TextView中
7 if ((event.getAction() == KeyEvent.ACTION_DOWN) &&(keyCode == KeyEvent.KEYCODE_ENTER)) {
8 myTextView.setText(myEditText.getText());
9 return true;
10 }
11 return false;
12 }
13 });
4、 RadioButton
单选按钮,放在一个RadioGroup中,在这个group中只能有一个选项能够被选中,比如你选择性别时,只能选择一个性别。
在layout/main.xml中声明控件。
1 RadioGroup android:id="@+id/radioGroup1" android:layout_ width="wrap_content" android:layout_border="1" height="wrap_content">
2 RadioButton android:id="@+id/radio0" android:layout_ width="wrap_content" android:text="Red" android:layout_border="1" height="wrap_content" android:checked="true">RadioButton>
3 RadioButton android:id="@+id/radio1" android:layout_ width="wrap_content" android:text="Blue" android:layout_border="1" height="wrap_content">RadioButton>
4 RadioButton android:id="@+id/radio2" android:layout_ width="wrap_content" android:text="Green" android:layout_border="1" height="wrap_content">RadioButton>
5 RadioGroup>
为了响应RadioButton的选择动作,我们可以有两种方式。
A、 定义单独的一个 myClickListener监听器,然后为每一个Radio注册这个监听器。
1 //1、定义一个我们自己的 myClickListener监听器,事件类型为OnClickListener
2 OnClickListener myClickListener=new OnClickListener() {
3 @Override
4 public void onClick(View v) {
5 // TODO Auto-generated method stub
6 RadioButton r=(RadioButton)v;
7 Toast.makeText(Android_Control_DemoActivity.this, r.getText(), Toast.LENGTH_SHORT).show();
8 }
9 };
10 final RadioButton radio_1=(RadioButton)findViewById(R.id.radio0);
11 final RadioButton radio_2=(RadioButton)findViewById(R.id.radio1);
12 final RadioButton radio_3=(RadioButton)findViewById(R.id.radio2);
13 radio_1.setOnClickListener(myClickListener);
14 radio_2.setOnClickListener(myClickListener);
15 radio_3.setOnClickListener(myClickListener);复制代码
B、 为RadioGroup绑定事件,在这个事件中判断选择的按钮ID来响应事件。
1 //2、使用RadioGroup的CheckedChange方法来监听我们的RadioButton的点击事件
2 myRadioGroup =(RadioGroup)findViewById(R.id.radioGroup1);
3 myRadioGroup.setOnCheckedChangeListener(new OnCheckedChangeListener() {
4 @Override
5 public void onCheckedChanged(RadioGroup group, int checkedId) {
6 // TODO Auto-generated method stub
8 {
9 Toast.makeText(Android_Control_DemoActivity.this, radio_1.getText(), Toast.LENGTH_SHORT).show();
10 }
11 if (radio_2.getId()==checkedId)
12 {
13 Toast.makeText(Android_Control_DemoActivity.this, radio_2.getText(), Toast.LENGTH_SHORT).show();
14 }
16 {
17 Toast.makeText(Android_Control_DemoActivity.this, radio_3.getText(), Toast.LENGTH_SHORT).show();
18 }
19 }
20 });
以上两种方法有什么区呢?A方法是只要你点击单选按钮系统就会响应,而不管你点击的是否为同一个RadioButton,B方法只会响应不同的单选动作,如果在同一个RadioButton上重复点击,系统是不会响应的。
5、 CheckBox
复选按钮。在应用程序中如果让用户选择自己的喜好时,因为用户的喜好不可能只有一个,所以这时你必须使用复选按钮,允许用户多选。
在res/layout/main.xml中声明控件。
1 CheckBox android:text="CheckBox" android:id="@+id/checkBox1" android:layout_ width="wrap_content" android:layout_border="1" height="wrap_content">CheckBox>
下面来响应用户的选择操作,通常情况下,复选框选择后是有一个按钮来统一提交的,但是我们在例子中只演示如何响应CheckBox的Change事件。
1 //为myChecBox控件绑定响应事件
2 myCheckBox = (CheckBox)findViewById(R.id.checkBox1);
3 myCheckBox.setOnCheckedChangeListener(new OnCheckedChangeListener() {
4 @Override
5 public void onCheckedChanged(CompoundButton buttonView, boolean isChecked) {
6 // TODO Auto-generated method stub
8 {
9 Toast.makeText(Android_Control_DemoActivity.this, myCheckBox.getText(), Toast.LENGTH_SHORT).show();
10 }
11 }
12 });
6、 Toggle Button
如果有用过android系统的人都知道,在开启和关闭WIFI的时候,有一个按钮,当你开启WIFI时按钮显示为On,当你关闭WIFI时按钮显示为OFF,这个按钮只有这两种状态。这个按钮就是ToggleButton。
在res/layout/main.xml中定义控件
1 ToggleButton android:text="ToggleButton" android:id="@+id/toggleButton1" android:layout_ width="wrap_content" android:layout_border="1" height="wrap_content" android:textOn="On" android:textOff="Off">ToggleButton>
android:textOn当在打开状态时,显示在这个按钮上的文字android:textOff当在关闭状态时,显示在这个按钮上的文字
响应Toggle Button的Checked事件
1 //响应myToggleButton的Checked事件
2 myToggleButton = (ToggleButton)findViewById(R.id.toggleButton1);
3 myToggleButton.setOnCheckedChangeListener(new OnCheckedChangeListener() {
4 @Override
5 public void onCheckedChanged(CompoundButton buttonView, boolean isChecked) {
6 // TODO Auto-generated method stub
8 {
9 Toast.makeText(Android_Control_DemoActivity.this, myToggleButton.isChecked()+"", Toast.LENGTH_SHORT).show();
10 }
11 }
12 });
7、 Rating Bar
评分条。可以根据我们的需要来定义他的增长速率和最大值。
在res/layout/main.xml中声明控件
1 RatingBar android:id="@+id/ratingBar1" android:layout_ width="wrap_content" android:layout_border="1" height="wrap_content" android:numStars="5"android:stepSize="1.0">RatingBar>
android:numStarts打分条中五角星的个数android:stepSize也就是你点击一次,会选中一个星星的多少,如果为1.0,那点击一次就是一颗星,如果设置为0.5那么就是半颗星。
1 //响应nyRatingBar的RatingBarChange事件
2 myRatingBar =(RatingBar)findViewById(R.id.ratingBar1);
3 myRatingBar.setOnRatingBarChangeListener(new OnRatingBarChangeListener() {
4 @Override
5 public void onRatingChanged(RatingBar ratingBar, float rating,
6 boolean fromUser) {
7 // TODO Auto-generated method stub
8 Toast.makeText(Android_Control_DemoActivity.this, "New Rating: " + rating, Toast.LENGTH_SHORT).show();
9 }
10 });
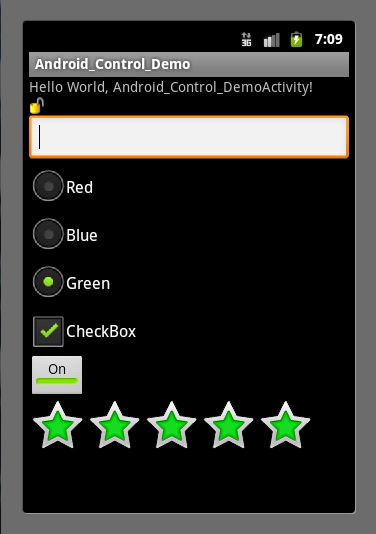
8、最后来个效果图
三、总结
在这篇笔记中主要介绍了七个主要的控件,下一篇笔记中讲介绍如何使用ListView以及一些用户自定义的ListView。另外,这篇笔记的代码也贴上来。
(本文来源:天极网 )
![]()
文章来源:http://tech.163.com/digi/11/1212/10/7L2MOM9A001628BV.html
免责声明:本文仅代表作者个人观点,与世界朋友网无关。其原创性以及文中陈述文字和内容未经本站证实,对本文以及其中全部或者部分内容、文字的真实性、完整性、及时性本站不作任何保证或承诺,请读者仅作参考,并请自行核实相关内容。


 谷歌街景地图将登陆Wii U
 二次元拯救世界!盘点那些卖萌的软件们
 最受欢迎的10款安卓应用
 七天语录:诺基亚最主要对手是Android手机