Android实战开发之:GPS定位实例
本文通过Android开发一个实例的实现过程来说明使用GPS定位技术获取当前位置的信息。本实例代码保存在“光盘:daima ”中,命名为CurrentLocation。下面开始介绍本实例的具体实现过程。
1)在AndroidManifest.xml中添加ACCESS_FINE_LOCATION权限,具体代码如下所示。
2)编写主文件main.xml,用于创建用户界面,具体代码如下所示。
android:layout_width="fill_parent"
android:layout_height="fill_parent"
>
android:layout_width="fill_parent"
android:layout_height="wrap_content"
android:text="@string/hello"
/>
3)在onCreate(Bundle savedInstanceState)中获取当前位置信息,具体代码如下所示。
public void onCreate(Bundle savedInstanceState) {super.onCreate(savedInstanceState);
setContentView(R.layout.main);
LocationManager locationManager;
String serviceName = Context.LOCATION_SERVICE;
locationManager = (LocationManager)getSystemService(serviceName);
//String provider = LocationManager.GPS_PROVIDER;
Criteria criteria =new Criteria();
criteria.setAccuracy(Criteria.ACCURACY_FINE);
criteria.setAltitudeRequired(false);
criteria.setBearingRequired(false);
criteria.setCostAllowed(true);
criteria.setPowerRequirement(Criteria.POWER_LOW);
String provider = locationManager.getBestProvider(criteria, true);
Location location = locationManager.getLastKnownLocation(provider);
updateWithNewLocation(location);
/*每隔1000ms更新一次,并且不考虑位置的变化。*/
locationManager.requestLocationUpdates(provider, 2000, 10,
locationListener);
}
在上述代码中,LocationManager用于周期获得当前设备的一个类。要获取LocationManager实例,需要调用Context.getSystemService()方法并传入服务名LOCATION_SERVICE("location")。创建LocationManager实例后,就可以通过调用getLastKnownLocation()方法将上一次LocationManager获得的有效位置信息以Location对象的形式返回。getLastKnownLocation()方法需要传入一个字符串参数来确定使用定位服务类型,本实例传入的是静态常量LocationManager.GPS_PROVIDER,这表示使用GPS技术定位。最后还需要使用Location对象将位置信息以文本方式显示到用户界面。
4)定义方法updateWithNewLocation(Location location),用于更新显示用户界面。具体代码如下所示。
private void updateWithNewLocation(Location location) {String latLongString;
TextView myLocationText;
myLocationText = (TextView)findViewById(R.id.myLocationText);
if (location !=null) {
double lat = location.getLatitude();
double lng = location.getLongitude();
latLongString ="纬度:"+ lat +" 经度:"+ lng;
} else {
latLongString ="无法获取地理信息";
}
myLocationText.setText("您当前的位置是: "+
latLongString);
}
}
5)定义LocationListener对象locationListener,当坐标改变时触发此函数。如果Provider传进相同的坐标,它就不会被触发。
private final LocationListener locationListener =new LocationListener() {public void onLocationChanged(Location location) {
updateWithNewLocation(location);
}
public void onProviderDisabled(String provider){
updateWithNewLocation(null);
}
public void onProviderEnabled(String provider){ }
public void onStatusChanged(String provider, int status,
Bundle extras){ }
};
至此整个实例介绍完毕。因为模拟器上没有GPS设备,所以需要在eclipse的DDMS工具中提供模拟的GPS数据。即依次单击“DDMS”︱“Emulator Control”,在弹出对话框中找到“Location Control”选项,在此输入坐标,完成后单击“Send”按钮,如图12-1所示。
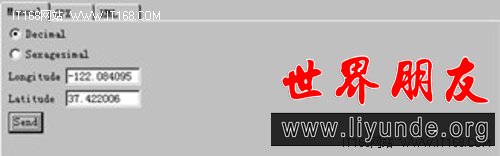
▲图12-1 设置坐标
因为用到了Google API,所以要在项目中引入Google API,邮件单击项目选择“Properties”,在弹出对话框中选择Google API版本,如图12-2所示。
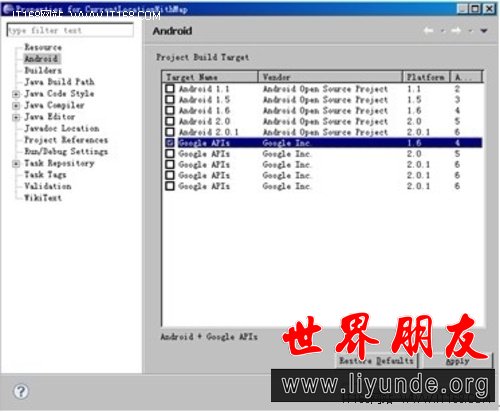
▲图12-2 引用Google API
这样模拟器运行后,会显示当前的坐标,如图12-3所示。
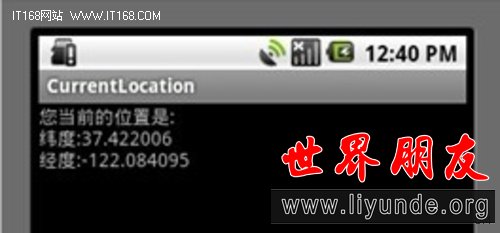
▲图12-3 执行效果
免责声明:本文仅代表作者个人观点,与世界朋友网无关。其原创性以及文中陈述文字和内容未经本站证实,对本文以及其中全部或者部分内容、文字的真实性、完整性、及时性本站不作任何保证或承诺,请读者仅作参考,并请自行核实相关内容。


 谷歌街景地图将登陆Wii U
 二次元拯救世界!盘点那些卖萌的软件们
 最受欢迎的10款安卓应用
 七天语录:诺基亚最主要对手是Android手机